항상 새로운 환경에서 딥러닝 환경을 구축하다보니 매번 비슷한 시행착오를 겪는거 같아서 작성함.
우선 아나콘다는 설치돼있다는 가정하에 시작.
1. GPU모델 확인 및 NVIDA 설정
- 기존에 설치된 설정 삭제하고 진행
1) 제어판 - 프로그램 추가/제거 - NVIDIA가 들어가있는 것 삭제
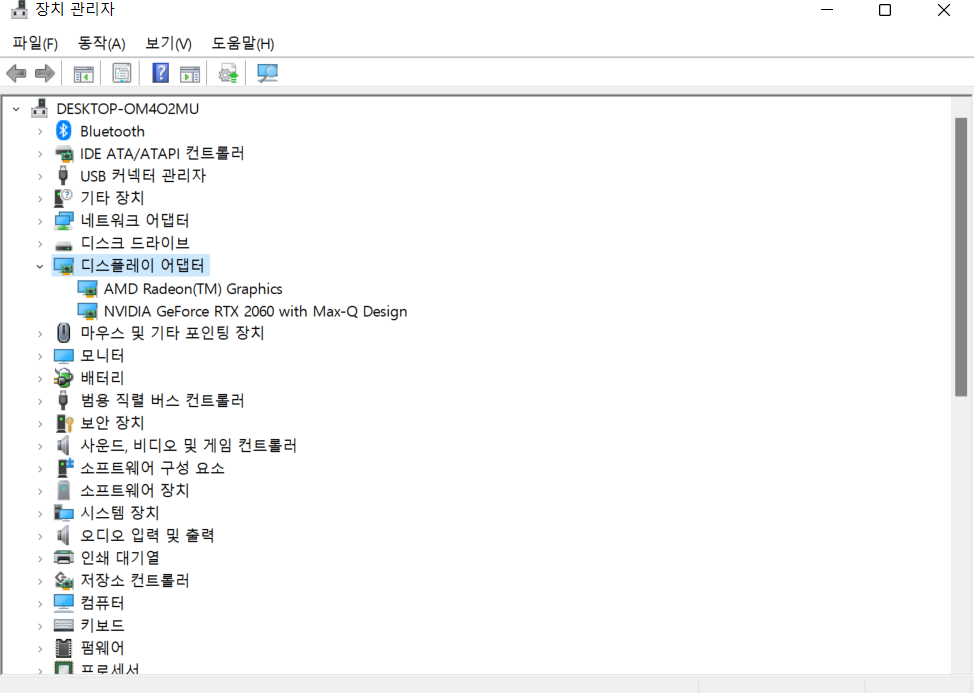
2) 그래픽 드라이버 다운로드 - 자신에게 맞는 드라이버 확인(하단 장치관리자 참고)
https://www.nvidia.co.kr/Download/index.aspx?lang=kr
3) 장치관리자 그래픽카드 삭제
4) 재부팅 후 기존에 다운받은 그래픽카드 실행
- 모두 "예" 하여 설치(중간에 Experience 설치는 자유, 저는 안했어요)
5) cmd에서 nvidia-smi 로 확인

2.CUDA 설치
1) 내 GPU가 Cuda toolkit을 사용할 수 있는 GPU인지 확인
https://en.wikipedia.org/wiki/CUDA
CUDA - Wikipedia
From Wikipedia, the free encyclopedia Jump to navigation Jump to search Parallel computing platform and programming model CUDA (or Compute Unified Device Architecture) is a parallel computing platform and application programming interface (API) that allows
en.wikipedia.org
내 Gpu는 RTX 2060으로 Computecapability 7.5에 해당. Cuda toolkit 사용 가능.
2) cuda toolkit 설치
https://developer.nvidia.com/cuda-toolkit-archive
CUDA Toolkit Archive
Previous releases of the CUDA Toolkit, GPU Computing SDK, documentation and developer drivers can be found using the links below. Please select the release you want from the list below, and be sure to check www.nvidia.com/drivers for more recent production
developer.nvidia.com
호환성이 좋아 toolkit 낮은 버전을 선호하지만 windows 11 환경을 사용하고 있어서 11.6 cuda toolkit 설치

exe 파일 실행 후 설치
3. cudnn 설치
https://developer.nvidia.com/rdp/cudnn-archive
cuDNN Archive
Download releases from the GPU-accelerated primitive library for deep neural networks.
developer.nvidia.com
1) 다운시 회원가입 필수

2) 회원가입을 하고 위의 링크를 들어가 자신에게 맞는 버전 클릭 후 windows zip 파일로 다운로드 본인은 8.4.0 설치

3) 설치받은 압축파일을 폴더로 압축 해제 후 bin, include, lib 복사
4) 내 pc -> 로컬 디스크(C:) -> Program Files -> NVIDIA GPU Computing Toolkit -> CUDA -> (다운받은 버전) ex) v11.6 폴더에 들어가서 복사한 bin, include, lib 붙여넣기
4. 환경변수 편집
이 부분을 안하고 넘어갈 수도 실행되는 경우도 있고 괜찮은 적이 많았는데 가끔 이 부분 문제가 생길 수 있음.
1) 제어판 -> 시스템 환경 변수 편집 -> 환경변수 -> Path 클릭

2) path에 들어가서 새로 만들기 클릭 후 아래의 주소 추가 (경로가 조금 다를수도)

C:\Program Files\NVIDIA GPU Computing Toolkit\CUDA\v11.6\bin
C:\Program Files\NVIDIA GPU Computing Toolkit\CUDA\v11.6\extras\CUPTI\lib64
C:\Program Files\NVIDIA GPU Computing Toolkit\CUDA\v11.6\include
모두 추가 확인했으면 확인 후 환경변수 창 확인
5. 파이토치 설치
여기서 설치하는데 에러가 생기는 경우가 많았음.
https://pytorch.org/get-started/locally/
PyTorch
An open source machine learning framework that accelerates the path from research prototyping to production deployment.
pytorch.org
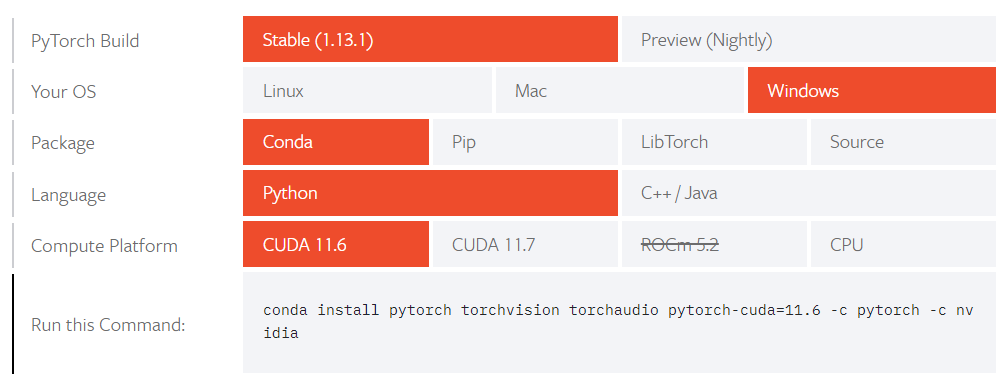
시작페이지의 이렇게 버전에 맞게 체크해서 설치를 진행했는데 에러가 나거나 설치가 되고도 cuda error이 나는 경우도 있어 바로 상단의 글을 보면 You can also install previous versions of PyTorch.이 적혀 있을 것인데 install previous versions of PyTorch 클릭하면 여러 다른 버전을 설치할 수 있음.
본인은 이걸로 진행하니 깔끔하게 설치 됐음.
pip install torch==1.12.0+cu116 torchvision==0.13.0+cu116 torchaudio==0.12.0 --extra-index-url https://download.pytorch.org/whl/cu116이후 설치가 잘됐나 테스트 들어간다.
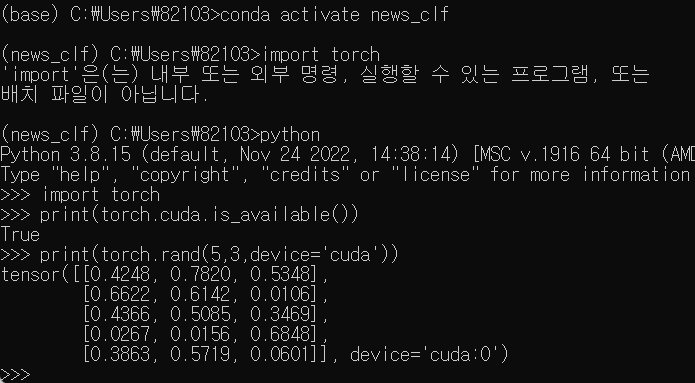
문제없이 실행
매번 업무 환경이 바뀔떄마다 새로 구축하고 cuda 버전 바꾸면서 매번 고생하다보니 그냥 기록하는게 마음 편할 거 같아서 첫 글로 시작했다. 다음에 우분투 환경에서 DL 환경 재설치 할 일이 있으면 우분투 환경에서 DL환경 구축 방법도 올려보도록 하겠다.
'Environment' 카테고리의 다른 글
| [Environment] NVIDIA-SMI has failed because it couldn't communicate with the NVIDIA driver 에러 해결 방법 (1) | 2025.02.05 |
|---|---|
| [Environment]아나콘다 가상환경 구성 및 주피터 노트북 커널 연결 (0) | 2022.12.30 |